URGENT UPDATE: A revolutionary five-step workflow for achieving flawless skin tones in Lightroom has just been unveiled by expert photographer Needham. This method addresses a common challenge in portrait photography—getting skin color just right. If your portraits often appear too green or pink, this guide could change everything for you.
Needham’s detailed tutorial emphasizes the importance of understanding how camera sensors interpret light and color. It’s not just about adjusting exposure or contrast; it’s about correcting inherent color biases in your camera before making any creative edits. The video, which has gained significant attention, reveals how different camera profiles can dramatically affect skin tones.
The first step in Needham’s workflow is selecting the appropriate camera profile. He compares Adobe Color, Adobe Standard, and various manufacturer profiles to highlight their impact on skin tones. His findings are clear: Adobe’s profiles offer the most versatility, allowing users to achieve a neutral base that can be refined further.
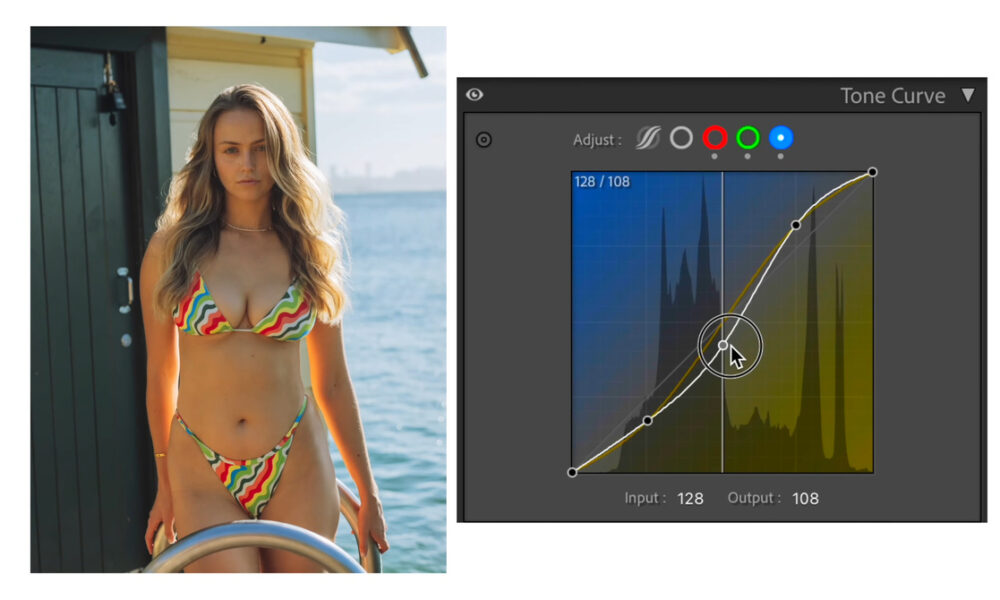
After correcting the white balance—often the most delicate aspect of color work—Needham dives into the RGB tone curve. Many photographers avoid this tool due to its complexity, but Needham shows how even slight adjustments can significantly alter the emotional feel of a portrait. For example, lowering blue tones introduces warmth, while increasing red yields a soft peach glow.
Next, he tackles color calibration, an area he describes as often misunderstood. Rather than viewing it as a mere stylistic choice, he refers to it as “sensor tuning.” Adjusting the red primary toward orange or the green primary toward teal can drastically improve skin tones, reducing any artificial yellow-green cast and enhancing natural, healthy hues.
Once calibration is complete, Needham uses the HSL panel for precise fine-tuning. Adjusting hue, saturation, and luminance can yield powerful results. A simple boost in orange luminance can lift skin tones, providing a clean, soft finish without sacrificing depth.
What sets this tutorial apart is Needham’s commitment to educating his audience. He explains the rationale behind each adjustment, allowing viewers to grasp the underlying color theory rather than simply following a formula. This approach makes the process accessible, rewarding patience and understanding.
For photographers eager to enhance their portrait work, Needham’s workflow offers a practical solution. By mastering these steps, you can achieve consistent, realistic skin tones across various portrait systems. This is a game changer for anyone looking to elevate their photography skills.
Check out the full video to see Needham’s method in action. As photography continues to evolve, understanding the science of color will remain crucial in creating compelling imagery. Don’t miss out on this opportunity to refine your skills and produce stunning portraits that resonate with emotion and clarity.